Covert GATSO detector
Reversing system
Home

HARDWARE HACKING (click on the photos for a larger image, and yes, I do take rubbish photos.)

Whistler 930 I stumbled across a few sites that talked about Hardware Hacking whilst doing some research at work (no really, I was). They set me off on a project I have been meaning to do for some years now. Hardware Hacking is the idea of either making some shop bought device do something better, different or else in addition to its purpose. I wanted my 
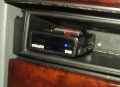
Radar Detector to be hidden, both from the low-lifes that might want to steal it, and from the tax collectors that masquerade as Policemen (no, they are not illegal now, but soon...)

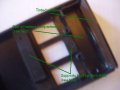
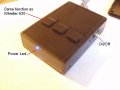
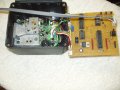
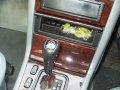
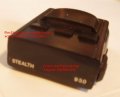
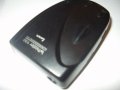
Remote control detectors are available but very expensive. This is how the conversion was done - and it works great! I bought my Whistler 930 in Arizona eight years ago for £35, and it has never let me down. About three years ago I bought an updated European version which is fantastic. More about this later, how it performs and how you can get one for a sensible price. This is the Whistler 930. It has three buttons at the back and a row of nine leds that indicate different types of radar or Laser speed gun. On the top there is a small bulge that houses a lightguide to that if a Laser is pointed at the back, it can be detected.

wired 
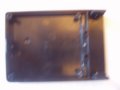
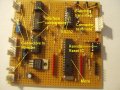
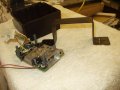
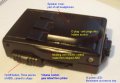
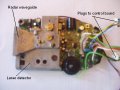
Four self tapping screws need to be removed and then the top and bottom of the case can be taken off - easy. Like most electronic equipment, the 930 is constructed from tiny components called 'surface mount devices or 'SMD'. It is fairly easy to solder to these but because they are so tiny, the wire has to be thin. I wanted easy connections with a wire that I could bend how I liked. The LEDs on the 930 are not SMD and are easy to get at, however when I measured the voltage on them I found that with the LED off it was 5v and with the LED on it was 3v. The reason for this is that there is (must be) a resistor from one side of the LED to the micro-controller - but this is SMD and I do not want to solder to it! To get around the problem I wired each LED to a comparator which translates the 3v and 5v levels into 0v and 5v. The wires are connected as you can see in another lousy photo here.

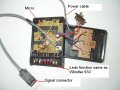
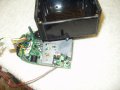
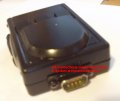
The audio alerts pose a whole new problem. I easily found a signal on the volume control that was easy to wire too again, but how do I get it back to the remote ? A few calculations showed that to send it as a 'message' needed a very fast connection. A could sample it and then generate the sounds in softare at the remote, but a better and very simple solution was to hand. More about that later, and by the way, code, schematics etc is available at no charge.

So how about the remote control ? I considered wireless but decided that was too OTT. The easiest of all to do is RS232 - your computer might still have a dial-up modem, and if it does, it connects to your PC via something called RS232. For almost a decade RS232 was THE communications hardware for computers. It is still handy now, but most PCs have dropped it, so now you get USB and maybe Firewire - both of which are too complex for a simple job like this.

case_btm

This is the bottom of the remote
control case.On the right end you
can see what is left of the battery compartment

case_top

And this is is the top
of the remote control case.

open_remote

A look at the electronics inside the remote

buttons

The three control buttons

remote This is the asembled remote unit.

Have you ever tried to glue a bit of plastic trim ? Not even Araldite will do it if the plastic is of the type known as ABS, and most Auto plastic is. I could not find a box to fit exactly where I wanted to fit it and so I got one that was almost okay, but too long. The one I chose had a space for a 9v battery. I cut that end off, leaving it open, and made a tinted window to fit over the end. Once I had glued on half of the battery lid, the box looked as if it had always been that way. Glued ? Yes, the answer is easy, now I have found out how! All you need is some Nitromors paint stripper. A very thin coat of that will not just stick ABS, it will fuse two bits together forever. I had to make up various bits to fit in the case and all I did was bond strips together until I had the right thickness. It is fixed after about 15mins, but I tried to leave it overnight. WARNING: Once stuck you will not be able to 'unstick' it!

Now we need to talk about the head end, the Whistler 930. Can you make all this ? If you are familiar with veroboard, MAX232, PICs and so on, then you can with no trouble. If not then maybe you know somebody who is ? The design of this system is such that it will work with ANY radar detector, not just the 930.
I found a box just big enough to fit the 930 into (without its case), and it gave me quite a lot of space for a controller, or interface board. I usually wire up the ground and 5v on the top side of the Vero, and then wire point to point underneath, all the signal wired, with a special fine wire I have for the purpose. I made up some long plastic pillars with M3 studs to secure the 930, and they also prevent my board from dropping onto the 930 and blowing it up!

So what about the sounds then ? From the beginning I did not want to mess around under the bonnet looking for a 12v supply. Its easy to pick that up from the cigarette lighter, so my cable has to have +12, 0v, Transmit and Receive - four wires so far. The MAX chips I used for the RS232 have two drivers and two receivers, and since I only use one of each, I have two spare. The sound is wired to a spare driver and sent up a fifth wire. This has the advantage that the sound is exactly the sound that the 930 makes, no matter what. Then I found a really nice flat cable used in networks that has six wires. You can see it in some of the photos.

I hate waste, and here I have an un-used cable. What if my interface goes wrong ? The remote sends a message every five seconds to make sure it is okay, and if there is no reply it makes a waling siren noise and flashes a led very fast (normally this led flashes every five seconds. This LED is not part of the 930 - it is an extra status LED that I added. The 930 has three buttons. I wrote code so that if the two outside buttons are held down, a reset is sent to the interface. This is dangerous because any interference could cause a reset. To get around this, the reset wire is fed by what is called 'a current loop'. What this means is that it is almost impossible to set off a reset by interference.

tx_top

Top side of Whistler interface

tx_btm

Track side of Whistler interface

whistler_wired

Wiring to the Whistler 930

head_assy

Whistler plugged into interface board

incar

It was designed to fit in here...

remote_incar

...and it does.

mounting

Mounting bracket for head unit

case1

Ready to assemble

head And finally, here is the head unit in the car. By luck (skill really), the window of the 930 is exactly in line with a grill opening - the grill is plastic so it does not have to be, buts its nice that it is.

You may have spotted a three pin connector on the interface with no label ? This is for a planned add-on Laser detector. The one in the 930 works fine through the grill, after all, its the number plate they point at. I plan to fit my own laser detectors around the number plate, and they will plug into this spare connector. It should cost less than £10.00

So there it is, job done. I am happy to part with schematics, code and even ready programmed PICs, I'll even supply some of that red wire I use to hook up all the chips. I have not posted the schematics because the file would be too big, but email me if you want to have a go.

One last note: I was paranoid about water getting into the head. The tinted window at the front is totally sealed (with Nitromors), and when the top was fitted I applied a bead of silicon sealer around the lip. Finally, well why not, I added a diagnostic port so that I can plug in my laptop and see what is going on - yeah OTT, but what the hell! We have had a lot of heavy rain since I fitted it, but no water got inside.

I have no connection with Whistler at all, it just happened to be the model I bought. The company is 100% reliable, I have bought half a dozen for friends with no problem, but customs will get you for the VAT. Better products and cheaper than most UK models, (and yes, they sell Euro spec models, just ask). They are unlikey to be thrilled about warranty repairs after this conversion...

THIS IS THE LINK TO WHISTLER. You may be surprised at some of their products - want to hide you number plate ? Check it out!

...but then. If there is a Mark1 there has to be a Mark2. The idea was to see just how many features could sqeezed into the same box and at the same time to see if a little styling could be done. This was when I discovered that the 10 year old Nitromors I had worked fine, but the new type you can buy now does not stick ABS at all. However, welding adhesive for PVC drainage is brilliant. So here it is then, the Mark2. Lighting up the accessory box is particlarly nice.

mark2_front

Front view of the Mark2

mark2_side

Side view of the Mark2

mark2_back

Back view of the Mark2

v2_incar01

Mark2 installed

v2_incar02

Mark2 installed


uparrow

Home | Childhood | My 1960s | The Army | Army Gallery | The Mike Williams Roadshow | Career
My Travels | The Cars | Short stories | Open University | CV | Interests | Projects | My Top 100 | Camcorder stills